Do you want to look younger for longer? Yoga can oblige you to get there, beginning with these postures to combat aging.
Keep young and fit with yoga.
The way we think about it, getting older isn’t all that bad. Physically, it appears like everything is going downhill after age 18. We lose balance, flexibility and strength, especially when we reach our 30s and the aches and pains come out of the blue.
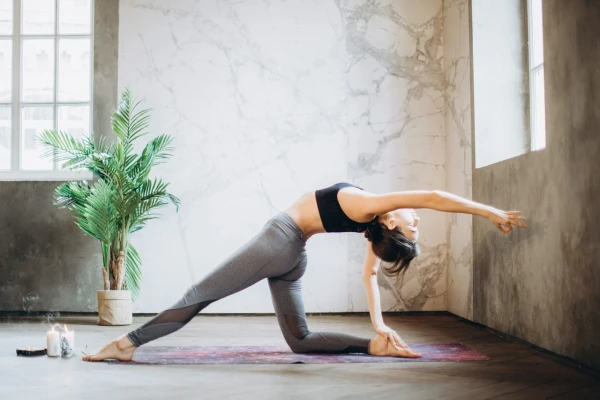
Are you looking for a simple way for keeping your body from as the years go through? Yoga could be the solution. It’s an easy way to build strength and stretch and is a great exercise to do anytime and almost everywhere. We requested Toronto yoga instructor Christine Felstead (our model for these pictures) to show us certain poses that can help slow the process of aging.
Ideally, it would help if you did the entire sequence at least a couple of times per week until you can do it every day at whatever time of the day suits your schedule. Begin by doing each pose for around five breaths. Then, take it up from there as you feel comfortable. If the entire sequence seems too much, you can incorporate these poses in your daily routine where they will work. If you’re overwhelmed, and it’s likely to cause you to age more quickly – or you need breaks during this sequence of postures, consider a child’s pose shown at left. Knees could be joined or farther apart, and arms can be placed alongside the body shown or out towards the front. Concentrate on your breath moving into and out of the body, and then let yourself ease into it.
If you have concerns about beginning a new exercise routine, consult your physician. Yoga instructors who are certified will be able to address any questions you have regarding the particulars of the postures. Don’t forget to breathe!
Equal standing
Felstead claims that this pose can aid in developing awareness of postural habits.
* With your feet in bare feet, sit on the yoga mat or the floor with your feet in a straight line and together, or hip-width-distance apart, arms hanging from the sides.
Concentrate on your feet and the way your body’s weight gets evenly distributed. Without lifting the soles of your feet off the ground, move them from side to side, forward and backward to side, shifting the weight of your body until it is brought back to its centre.
When you focus your attention upwards the body, feel your hips are placed over the ankles, and your shoulders are stacked over your hips. Reposition your chin to make sure that your skull is balanced against the spine. You want to reach an equilibrium which means you’re using as little strength as is possible to stand.
Imagine a string pulling you upwards from your crown head. Be aware of your posture and sit up straighter without straining any muscles, like the glutes.
Alter it by closing your eyes and observing the way your balance shifts. You can also try the pose in front of a mirror. Then examine how you feel compared to the straight, even and polished appearance.
Tree pose
Balancing is known for being more difficult with age, according to Felstead. Yoga poses like the tree pose is basic balance postures that can assist you in keeping your skills.
Start with a standing posture. Then shift your entire body weight to the left leg and foot. Bring your hands into a prayer place in front of your chest.
* Place your toes on the top of the left foot, and extend the right leg and hip.
* If your balance seems unstable, place your right foot on the floor and place your left heel on the inside of your left calf. If you feel stable, lift your right foot off the floor and place it against the inside of your right calf or left leg, taking care not to press on the knee.
* Pause for a couple of moments to breathe, then slowly lower the weight and repeat on the next side.
Make it more challenging: Test your balance by raising your arms higher than your head or looking upwards towards the ceiling.
Squat
A strong thigh muscle will protect knees from injury and pain, says Felstead.
* Begin in a standing position with feet close to each other and arms in front of you.
* With your feet and knees in the same place and then sit as if you were sitting in an armchair. Make sure that you’re comfortable and steady; however, do not forget to work your muscles. To safeguard your knees, Make sure that they are behind your toes and not forward.
* While doing this, keep your arms straight ahead of you to help you maintain your balance.
Variate it If it’s more comfortable to stay balanced, you could perform this pose with your feet that are hip-width apart to ensure that your knees are towards exactly the direction of your toes and that they are not bending into the side. Try to see the amount of depth you can do with a straight spine and healthy knees.
Downward dog
A well-known and classic yoga pose, a downward dog, strengthens the upper body, assists in maintaining the development of a healthy spine, and stretches the back of the body.
* Begin with knees and hands, with shoulder blades in the shoulders and knees under the hips. The fingers should spread widely while engaged with the middle fingers facing towards the forward direction. Check behind and make sure that your feet are approximately an inch apart.
• Curl your toes and extend the tailbone towards the ceiling. From here, you should keep your heels up off the ground and maintain your knees in a slight bend. Knees.
Straighten your knees gently and lower them towards the flooring (it’s unlikely to touch) to feel a gentle stretch at the rear of your legs and the back. If it’s uncomfortable, you can bend the knees a bit more until you feel more comfortable. People who aren’t very flexible may need to place their feet a little further from each other.
Instead of pouring all weight on shoulders, try to distribute it evenly between feet and hands. Engage your arms and hands as if you were looking forward to using your hands. Bring the belly button closer to the spine and work the core instead of sliding down the ribs.
Alter it around. For flexibility training, particularly at dawn, push your feet to the point you stretch one leg and then the other. If you’re solid enough and your shoulders feel relaxed, you can easily move from straight downwards to plank posture.
Plank
This posture focuses on your upper body and core strength, Both of which are susceptible to decrease as we age…
Begin on knees and hands, making sure that your shoulders are directly beneath your wrists and hands are fully engaged.
* For the first level, walk backwards on your knees till you’re on a straight line between your knees and shoulders. Keep your abdominal muscles towards the spine, and then use your abdominal muscles to prevent your legs from sinking. Be sure that your wrists are in a straight line under your shoulders.
* For the second level, take a step back from your knees and place your toes in a way that your entire body is straight from the shoulders to the heels.
Modify it If this pose is causing pain to the wrists, try descending onto the forearms, with your hands in a closed position and the elbows placed underneath shoulders. As level 2 becomes more comfortable, you can challenge yourself by lifting both feet for a few breaths or two each.
Seated twist
Twists help maintain a healthy spine and relieve back muscles that are tight due to excessive sitting.
Relax in a crossed-legged position, with the spine straight. If you are in a slump, try placing a blanket or cushion, yoga block or a bolster on your hips.
Inhale, and then sit as straight as you can. When you exhale, turn gently to the left, beginning the motion from the base of your spine, letting it continue upward. While moving, put your left hand on your right knee and place the right hand behind to provide stability. The head should be moved last and only as far as you can comfortably move without strain.
* Each time you inhale, stretch your spine. You’ll likely drift slightly away from the twist. Each exhales, you can gently twist the spine further.
* Return to the centre after the inhale and repeat to the left, ensuring you switch your legs’ crossing first.
If you need a walk-in clinic service you can visit brontemedicalcentre.com